

16 Apr Anatomy Set in Stone: Planning, Prep and Practice
It’s not revolutionary to tell you that if you have a big project in mind, you can save a lot of time and frustration by doing as much advance planning as possible. You’ll still need to amend, revise, improvise and adapt as you go but the more you can nail down the big questions the better. So here’s a description of some of the plans and choices that went into my Anatomy Set in Stone project. I’m writing this with the benefit of hindsight, so I’m going to describe how I started out, but include some of the changes I made along the way as well.
First off— why create twelve large mosaics in the first place? Surely one would be enough to catch the eye?
The biggest reason is that I want to create not just an object but an experience… we’re so bombarded by imagery that a single image holds our attention for less time than it took to read this sentence. My hope is that by developing a series that can be viewed together, people will be moved to explore a more deeply, compare one mosaic to the next, compare the mosaic to the original drawing, compare the art to their own body and hopefully come away with a bit more knowledge of how the human body works. I keep thinking of the overall exhibit as a hall of mirrors that shows us what’s under the hood. As an exhibit, it lends itself well as a stage for selfies but I hope that it also can be as cool as that first time a kid walks into a hall full of dinosaur skeletons. I wanted to do something big enough it would really knock people’s socks off.
Also— I enjoy working in series. With each successive piece you have the opportunity to apply what you learned on the last, even while facing new challenges. There’s this interesting rhythm of what you do and don’t yet know, what you may have forgotten or are about to discover that holds my interest. In this case, each piece is really quite different even though the same muscles and tendons show up again and again. Depending on the pose, they create very different forms. Interpreting the drawings and deciding whether I’m looking at tendon or ligament or fascia and which kind of stone will best represent that while being true to both the drawing and biology is really fascinating. It brings together a lot of interests I’ve had my whole life, showing that even if the branches of science are considered separate, a curiosity about the world unites them.
Step One: Defining scope, scale and style
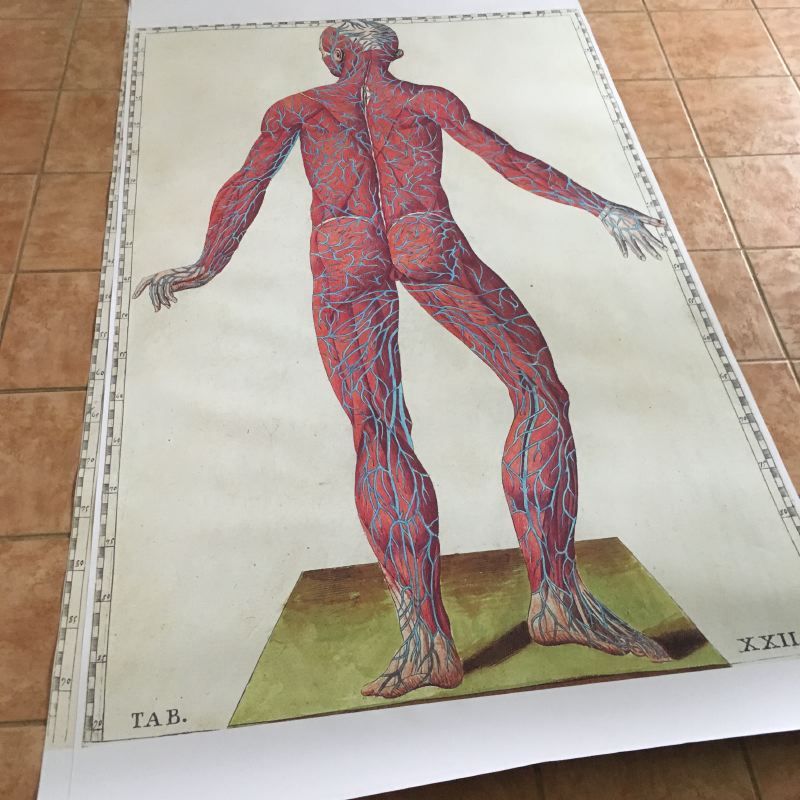
The first thing I had to do was find a source of the original etchings that I could print life size to use as guides for the mosaics. The U.S. National Library of Medicine was kind enough to provide high resolution scans of their 1873 edition of Bartholomeo Eustachi’s Tabulae anatomicae. I did have to edit these a bit in Photoshop to remove some curvature caused by the book’s binding. Once I had the art, I had to decide exactly how large to make to mosaics and what to include. Choosing the size took longer than you would think.
Here’s a mock-up I made in Adobe Illustrator so that I could look at proportions, while scaling the drawing very precisely:
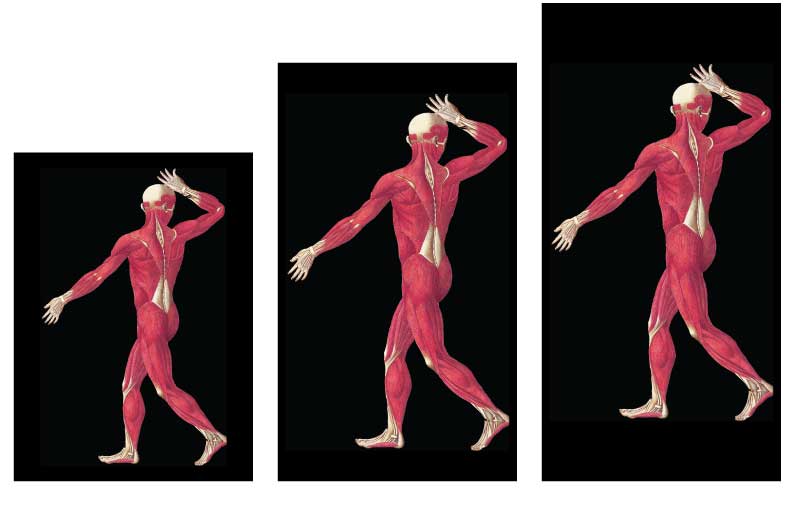
Left to right: a 5′ tall figure on a 5′ 6″ x 4′ background, a 6′ tall figure on a 7′ x 4′ background and a 6′ tall figure on an 8′ x 4′ background.
Cement board comes in 4 x 8 foot sheets so I initially just assumed I would make the mosaics 4 x 8 and make the figures as tall as I could.
BUT! Some of the figures have their arms at their sides and some have them extended like the figure above. This caused immediate problems because the figures whose arms were extended could not be wider than 4 feet and thus kind of defined the size available. I wanted the figures to be fairly consistent in height and I wanted that height to be fairly close to “life size” (or average American height which is 5′ 10″ for men). In the mock-up above, the left-most size would have (literally) saved thousands of dollars in material but just wasn’t big enough and wouldn’t allow enough detail. The rightmost size was fine, but I felt there was too much empty space at top and bottom. It looked awkward and suspended the figure in air too much. I ended up choosing the middle size, 4 x 7, which is an odd size, but the one that worked best for the project. I have to say, I’m really, really glad I worked this out before ordering stone or ordering steel frames!
One thing people don’t always realize about mosaic as an art form is that it’s much easier (even faster sometimes) to work larger than to do a small mosaic— because mosaic is made from cut or broken bits of material, you just can’t get very much detail unless you work at larger scale. The smaller the dimensions of the mosaic, the smaller you need to cut the tesserae. Even at four by seven feet, some of the pieces of stone I’ve cut have to be tiny to really capture the level of detail I’m looking for.
The next choice was background color and which details to include or exclude.
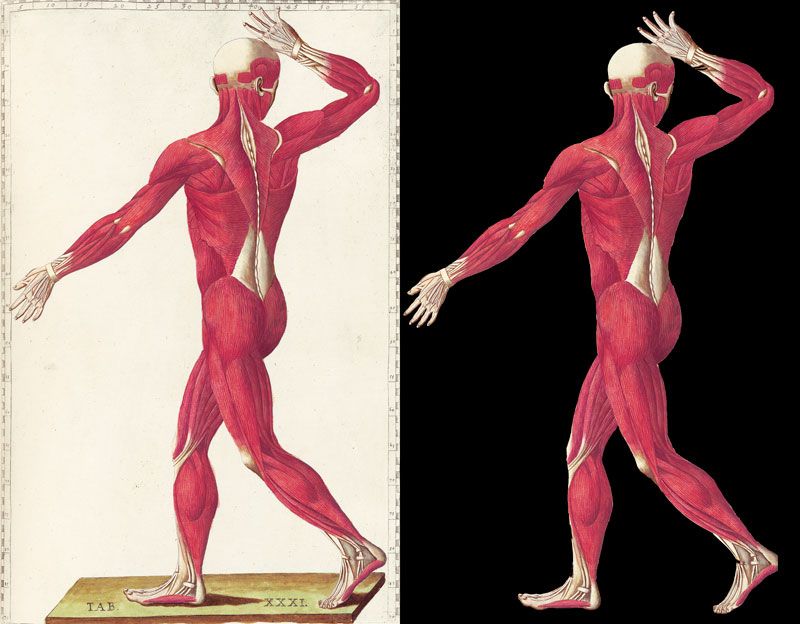
I knew from the start that I wanted to go with a black background to make the figure pop. It truly makes the image much more bold.
Similarly, I did away with the greenish plinth that the figure stands on in the original plate and the roman numeral for the plate number. Later, I kind of regretted not keeping the roman numeral, because it would have made it easier to refer to each piece, but hey, that’s what wall plaques are for, right?
I also left out the numbered ruler that borders three sides of the original print and which is used to refer to areas of the drawing in the accompanying text (I believe I read that Eustachi invented this type of legend for drawings but now I can’t find the source). I considered having the numbered ruler laser engraved on the mosaic’s frame, but I’d have had to use stainless or aluminum for the frame to make that work and the cost was way too high. Stainless or aluminum would also have been too vulnerable to scratches as the exhibit travels.
In the end, I’m happy with all these choices— the mosaics look great with the black and the lack of distractions. The rust finished frames I’ve used had the added benefit of really drawing out the reddish tones of the marble used for the muscles. That was one of those unconscious decisions that often happen for me where you totally make the right choice without realizing why at the time you make it.
The last choice, and this was a big one, was whether the mosaics would represent the drawing or the anatomy. For instance, in Table 31 shown above, the pinkie on the right hand is curved in a way that fingers just don’t. I would guess that the corpse they were working with had a broken bone in that finger. I chose to reproduce the drawings as accurately as I could, but to make small edits here and there to minimize things that seemed off. So— in the mosaic of Table 31, the pinkie is also curved but curved just slightly less so. When one of the drawings is unclear, I have a huge library of anatomy books I can reference for clarification but I still try to match the Eustachi drawing as closely as possible.
I used MegaPrint to print out the guide drawings. The quality is excellent, great prices, great customer service, the drawing always arrives in two days, everything about them is top notch. It can be a little confusing to figure out their website but if you call and tell them what you need and what you’re doing they will totally, cheerfully, walk you through the order process.
Protip: On a series like this, enough time went by between orders that I would forget how I had formatted the art the last time, so finally I took all 12 drawings into one Photoshop file in layers, scaled them all consistently, and then just exported each layer as needed. Saved me from reinventing the wheel every time. Also, in humid months, I had trouble with the drawing bubbling up and getting uneven so now I get them laminated. I didn’t even know you could laminate something that was 4 x 7 feet!
Step Two: Choosing and Sourcing Stone
Here’s the showroom of Complete Tile where I bought the bulk of the stone for this project. It’s like a big crayola set to me. I wish I had this many colors to draw from at home!
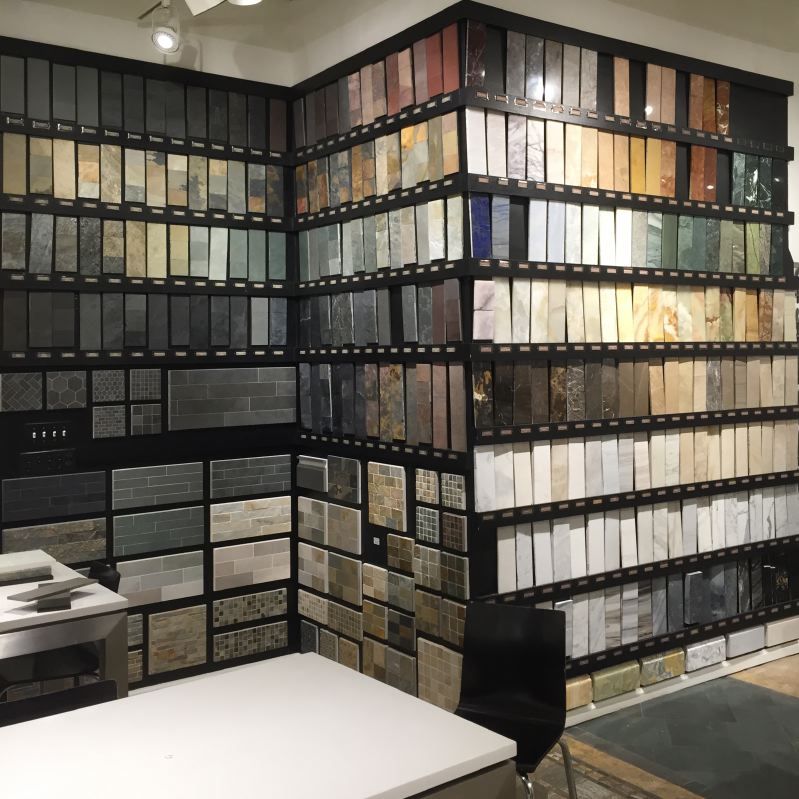
When you’re planning a large project, you need to buy all your stone at once if you want the color to be consistent. Going back to the same store or even the same quarry later can get you very different results for the same stone because it’s been dug from a different area. Even when you order all at once, because stone is a natural material, there will be a fair bit of variation (which can actually be a very good thing for shading if you select well). Some stone, like the black marble used for the background, will remain pretty consistent but the colors used for the figures all had to be acquired at one time.
On previous stone mosaic projects, I’d only worked with 5/8″ square mosaic tiles, cutting them as needed with tile nippers. For this project, I really wanted long thin strips of stone that would emulate the striations of muscle. I spent days trying to find a source and finally discovered Complete Tile’s Katami line:
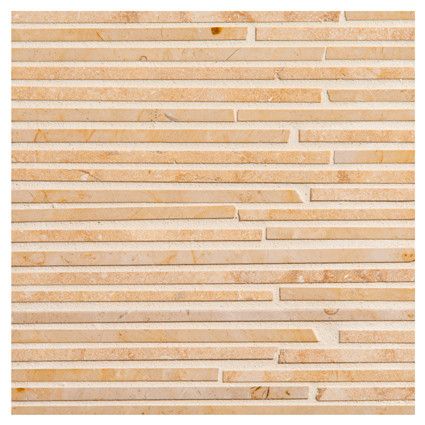
This was perfect! The problem was, it was mostly available only in blends, and didn’t come in exactly the colors I needed. Having it produced custom would have taken months and would have cost $150/square foot! Like most mosaic artists, the idea that I’d need to start with 12″ x 12″ floor tiles and cut them down to tiny sizes seemed, um… unnatural, but I resolved that if that was what I needed to do, I’d do it.
Here’s the initial palette of colors I chose:
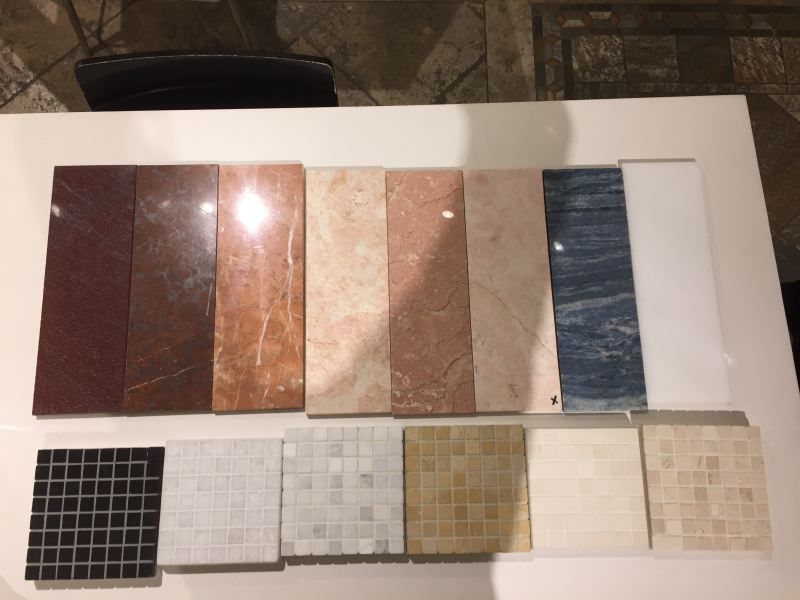
There are three reddish brown tones for the muscles, Three pinkish tones for skin (but it turned out that the darkest one was unavailable). The blueish stone I hoped would work for veins but I later decided it had to be lapis lazuli, the bright white was used for nerves, the black for backgrounds and then… all of the white and beige mosaic-cut stone was going to be used for bone, tendon etc. but looked weird next to the long-cut stone and so had to be set aside for another project some day. I honestly don’t know what the hell I was thinking mixing the two? Defaulting to old habits, I guess.
Total outlay for that first order: $8,668.89. Since then, that number has at least doubled (in part to replace all the colors that were at first ordered as pre-cut mosaic, but also as I discovered I needed more colors).
One thing I would do differently in the future is take the life size drawing with me to the store and lay the stone out on it. Instead, I had my laptop and was zooming in on the digital image trying to anticipate what I would need and estimate how much of it I would need. Overall, that worked okay… But there were a lot of areas of the drawings where the colors and textures just weren’t clear enough on a small screen. I had to order more stone once I saw them life size, especially for the shaded and hatch marked areas.
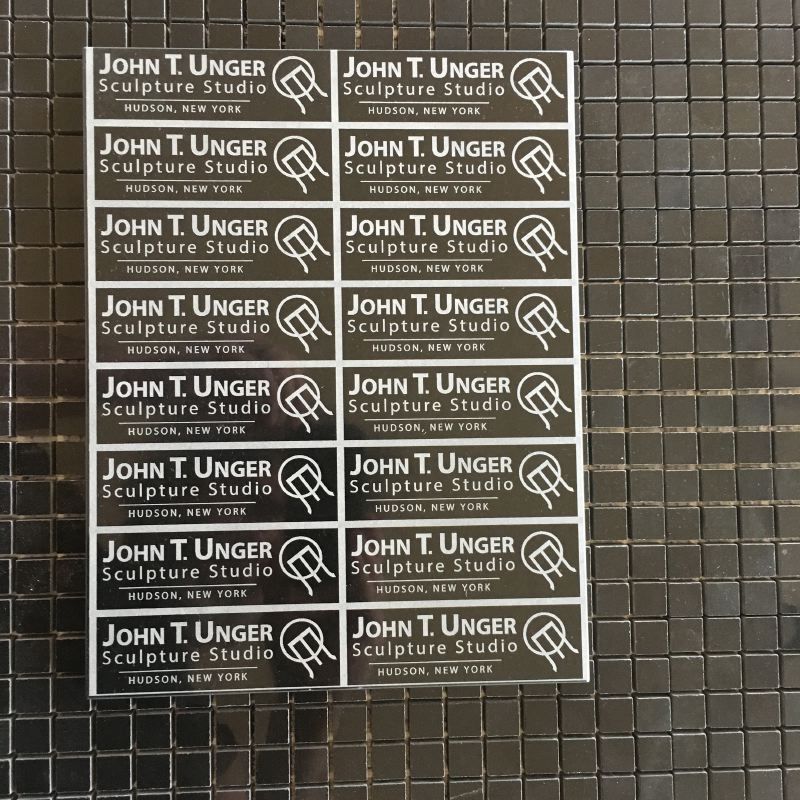
One thing that has always bothered me about mosaics was having to sign them on the back— but for this project, I came up with the idea of having my name laser engraved on black marble tile and then cutting it into pieces I could insert into the background! I had this done at Etched In Stone. Definitely a trick I’ll use again in the future.
Step Three: Tools, from primitive to professional
These three tools are my core tool kit for mosaic.
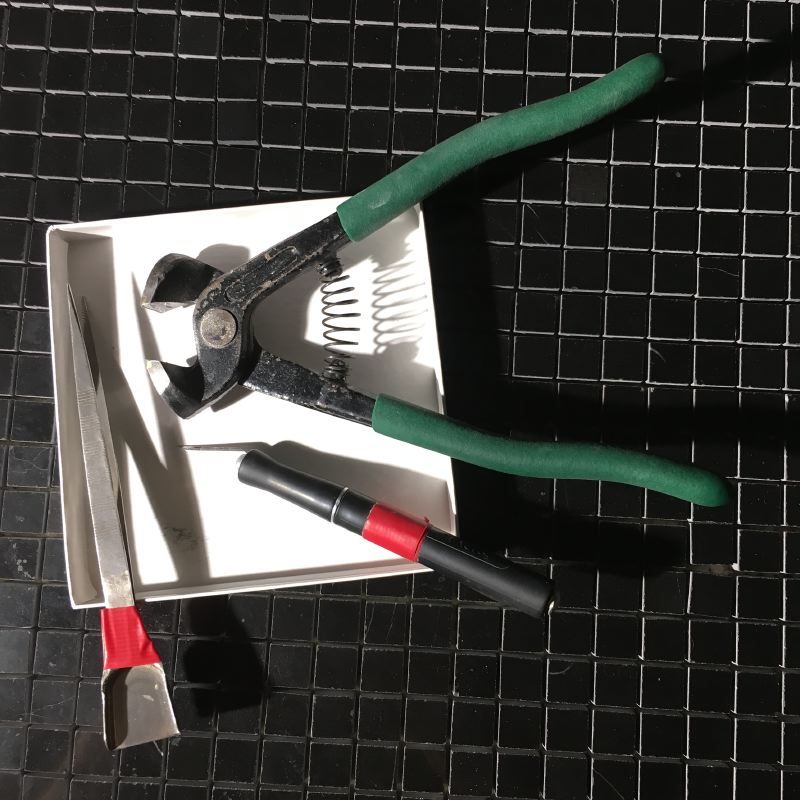
When I began the project, I assumed I wouldn’t need anything more than the tools I’ve used on every other mosaic in the past: An X-acto knife, tweezers and tile nippers (the red tape is so I can find them when I set them down on the black tile background). I favor the X-acto X3627 Black Gripster which is far more comfortable in the hand and hence more precise. The X-acto is used mostly for nudging tiles into place, but also, of course for cutting things (tape, mesh for tile, removing the mesh that is epoxied to fragile marble, etc.) The nippers are just your basic Home Depot nippers… If I could find a set with wider jaws (to allow me to make longer, skinnier angle cuts), I’d love that but so far, no luck. The tweezers I found at a mineral show and I don’t know who made them but they’re perfect. They open just wide enough to lift a 5/8″ mosaic tile. I bought and discarded about 12 different tweezers before these.
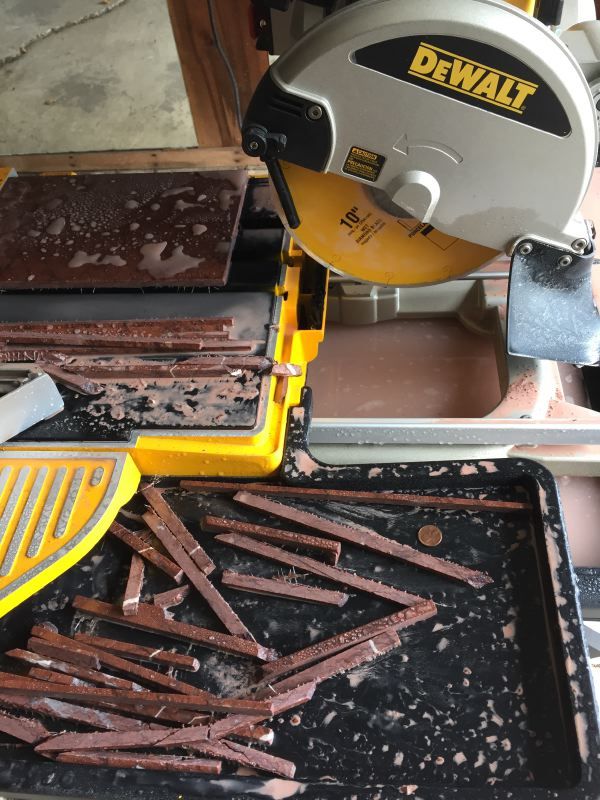
In order to cut thin strips of stone, I needed a wet saw. I did a fair bit of research and settled on the Dewalt D24000S Heavy-Duty 10-inch Wet Tile Saw.
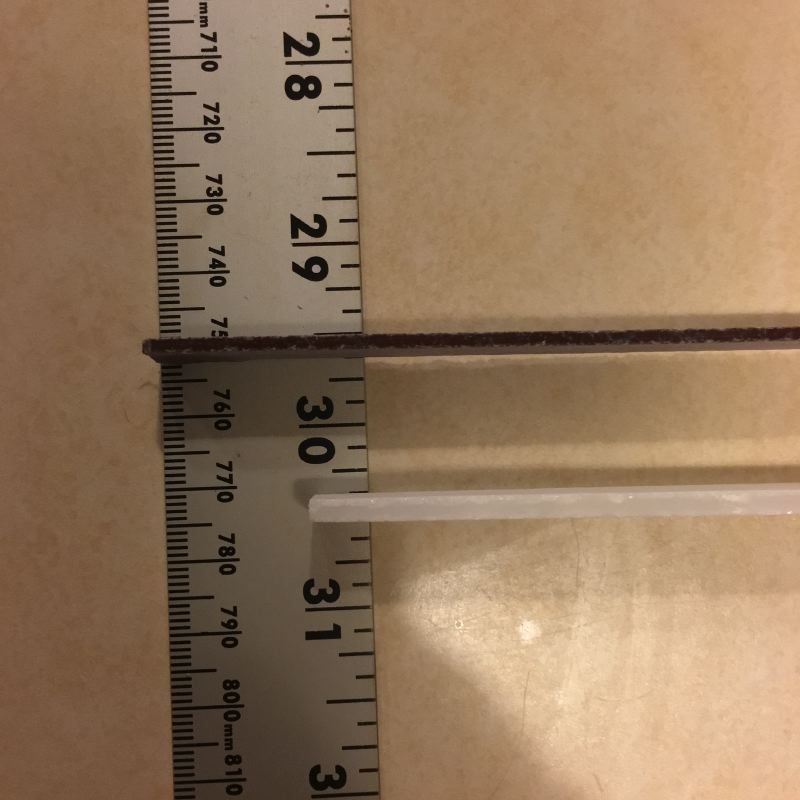
Okay, this saw is freaking amazing. First of all, it’s a total workhorse. I’ve cut more than a linear mile of stone at this point without replacing anything but the blade. It’s never jammed, overheated or thrown any kind of fit. I love this saw. The only thing you have to watch out for is making sure the blade is perfectly squared up. It doesn’t go out of whack much, but it’s a good thing to keep an eye on. The diamond blade that comes with it is one of the best I’ve tried but not quite as good as the SG-10 Solid Gold 10” Diamond Blade. And even though I was told there was no way it would cut stone as thin as I needed, I’ve been able to cut to widths as thin as a millimeter or two. Witness:
I pre-cut a great deal of stone before starting the first two mosaics. I intended these to be a winter project when firebowl sales naturally slow down, and the wet saw was in an unheated building that wouldn’t have water during the winter. At first, I just cut free hand, without using a stop or measuring the widths of the strips. Sizes were pretty consistent just eyeballing the cuts, but as I worked I realized how much better the tile fit together if widths were consistent. I also learned that if you butt another stone tile up flush with the edge you’re cutting, it dampens the vibrations from the saw blade and allows you to cut the stone thinner and more precisely. There are always places where you need a piece that is wider or thinner than the norm, so most of that tile I cut early on will still be useful. This winter I moved the saw into the basement of the house so I have access to it all year round and can cut any special pieces as needed. I built a hood from corrugated plastic to contain water spray and wet stone dust.
The four tools above were all I used for the bulk of the first two mosaics. About midway through the first mosaic, I had to make some shapes I couldn’t do with the nippers (like the pointed ovals of the spine) and did that by holding the stone up to the blade of the wet saw. I do not recommend or endorse such foolishness! Nothing bad happened to me but you could lose a finger or a hand that way. I also used the wet saw to shape the sapphires for the eyes of the second and third mosaic. I needed a lapidary tool but I just didn’t want to spend the money at that point. So I improvised…
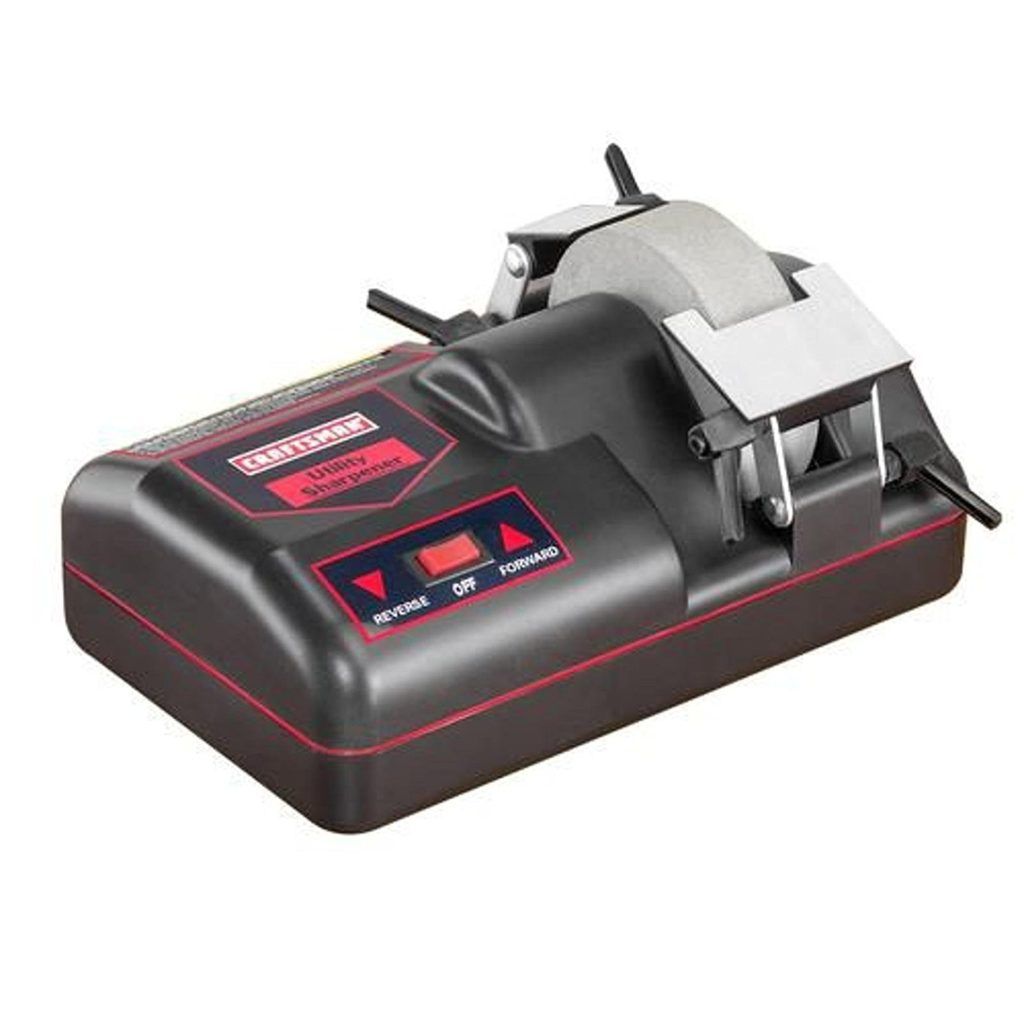 Eventually, I remembered I had a Craftsman Utility Sharpener out in the shop and gave that a try. For $64, this is an awesome cheap substitute for more than one lapidary tool. You can’t shape hard gemstones on it (hence holding sapphires to a wet saw) but it works great on marble and would easily shape ceramic and probably glass. It runs in two directions, forward or back, which is very handy (both for ergonomics and for when you’re shaping a delicate edge and want the wheel to come at the weak part not against it). It’s reasonably quiet. It has a water reservoir, so keeps dust down and material cool. But what I really loved is that there are three different surfaces that can be used— the intended surface of the wheel, the flat sides of the wheel and the hard corner of the wheel. So you can grind flats, shallow curves or sharp angles/deeper curves. One drawback is that you have to rinse out the water reservoir quite often. The biggest drawback is that the wheel is not replaceable. On the other hand, now that I think about it, this entire machine costs less than one diamond disc for the lapidary machine I have now, so… actually not a bad value at all for many mosaic artists. I, however, have moved on.
Step 4: In which I finally do what I should have done in the beginning
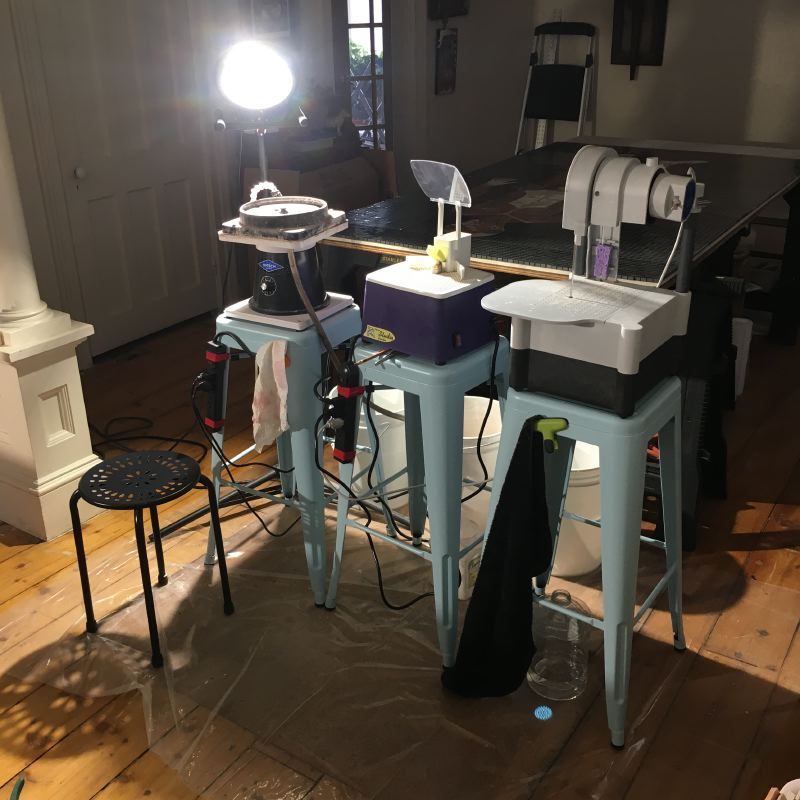
When I got to the drawings for the nervous system I knew I would need a proper lapidary tool to shape the nerves (and the adjacent stones that fit to them). I started with the Hi-Tech Diamond 8″ All-U-Need lapidary grinding and polishing machine (far left, above). I added the optional Pro-Flow water cooling system with a water pump, which I’m really glad I did. Most people probably use lapidary machines primarily for gemstones, but when you’re using them to shape marble, there’s much more sediment created than the machine is designed to handle. Having a steady stream of water helps immensely with that and most days I go through almost 5 gallons of water. (Pro tip: Rather than washing out the tray with a hose, cut a strip from a fake or expired credit card and use it to scoop the sediment out of the tray. Faster and cleaner!) Behind the machines above, you see three five gallon buckets. One holds the pump (and water) for the All-U-Need, one is for waste water than drains from the machines and the third is for carrying water to refill the pump bucket (much easier than lifting the pump out and having it drip water all over).
There is honestly no way I could have done the more complex mosaics without the All-U-Need (or at least something similar). All of the rounded points of the nerve ends are done on this tool, as well as many other curves on the outer surface of stones. Long triangles or sharper angles that couldn’t be done with nippers are now simple. I’ve been running the machine 6-8 hours a day for months and it has held up beautifully. It’s given me the ability to work in much greater detail.
The people that work at Hi-Tech Diamond are really great about providing advice and tech support, by the way, and when I called to ask advice about how to align polishing pads on the backing disk (after having just ruined one by mis-aligning it) they shipped me a free replacement.
The All-U-Need can also double as a spindle grinder, which allows for curves on the inner surface of stones, but eventually I got tired of switching back and forth between the flat wheel and the spindle (especially because I often needed both tools for shaping one piece of stone) so I expanded the lineup.
I needed to be able to cut raw ruby crystals to size to make cabochons for the eyes, so I ordered a Gryphon C-40CR Custom “AquaSaw XL” diamond band saw (far right in the picture above). While ordering the saw, I noticed that the Gryphon Studio Stained Glass Grinder was a pretty reasonable price for a spindle grinder so I picked that up as well. The Stained Glass Grinder has a built in reservoir that holds a wet sponge up against the grinder to keep it wet which is much easier than manually holding a wet sponge… but it seems to only fit to the 1″ grinder bit. Still, that’s the one I use most and the table surface makes spindle grinding a lot easier than the All-U-Need by supporting the work piece and keeping it level.
I didn’t initially use the band saw a lot, but recently it’s become my favorite tool… it takes some getting used to because the blade is looser than it would be on a standard band saw (to cut hard materials like stone, it has to be loose to prevent snapping). The looseness of the blade makes it a little hard to get a cut started, but once you’re in, it does very precise curves. For instance, look at the six pieces of stone I cut to make this ear:

I often use the flat lap and the spindle grinder to clean up the edges of cuts made on the band saw… I think that’s probably more the fault of my cuts than of the saw, but it’s really handy to have all three tools lined up together.
Other tools and materials I’ve used extensively on this project
Fulton StableMate 36-Inch Tall Sawhorse: I started with cheap plastic sawhorses that were a lower height, causing a ;lot of back pain from leaning over the mosaic while I worked. Plus, I needed 6-8 plastic saw horses to feel safe about the weight. A pair of galvanized steel Stablemates will hold 1000 pounds. They’re extremely stable, have durable rubber feet to protect your floor, are a comfortable work height and will last a lifetime. Highly recommended. They aren’t cheap but they’re cheaper than buying a ton of plastic or wood saw horses and replacing them again and again.
CDNT 358 Polyethylene Film: This is the tape I’ve used for at least 15 years to hold finished mosaics together for installation. You can get it cut to any width, but I find 12 inch rolls easiest to work with. It will hold its grip for years without any of the tesserae of the mosaic shifting (I have some mosaics I finished over 10 years ago but still haven’t installed). Caveat: It’s extremely important to be careful laying the tape down— if it buckles or folds it can grab parts of the mosaic and pull them right out! The best way to apply it is to have one person hold each end, droop the middle down to hit the mosaic and then slowly roll the tape down onto the mosaic towards you.
Ardex WA Epoxy Grout: Epoxy grout can be tricky because you must get all the haze off before it sets and that requires a lot more passes with the sponge than grouts based on cement or mortar. However, the richness and depth of the colors are worth it! Use the Ardex T-7 Square Grout Sponge, which has better corners for cleaning up haze than standard grout sponges. Ardex WA can also be used as an adhesive (mortar) and I’m going to try that on the next install.
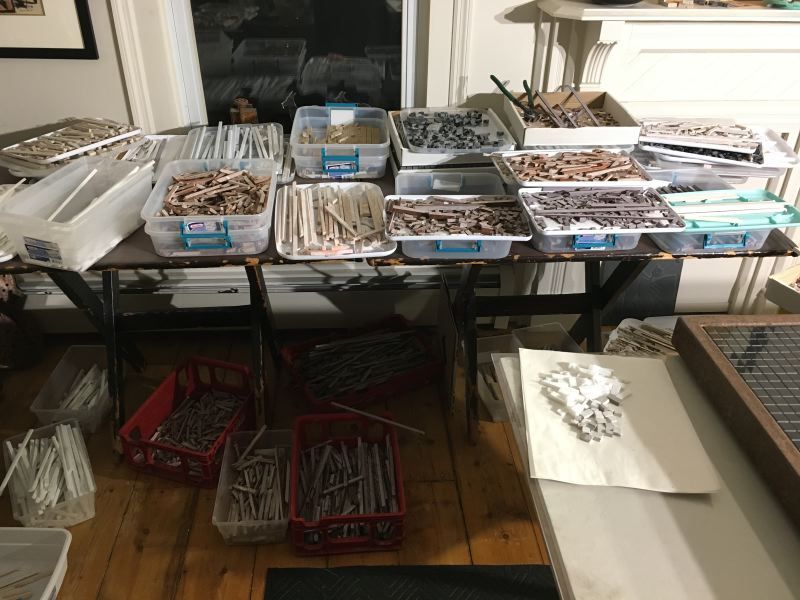
Plastic storage boxes: You just can’t have too many! I find the lids of the boxes more useful for holding tile while I work but the boxes are good for storage and sorting. Every color gets its own box, and to make life easier, some colors get different boxes for each width (thin, medium, wide).
Heavy duty LED work lights: You have to be able to light the mosaic from multiple angles as you work because the tile is thick enough that it casts shadows over the drawing. At a minimum I use two 1000 watt equivalent lights at different angles, but sometimes I have to supplement those. A good overhead fixture would help but I think I’d still want lights I can aim as well.
Everything listed above is stuff I’ve worked with extensively and really put to the test. There are some new things I plan to try soon, and I’ll add them to the list if they pass muster. Note: some links above earn me a small affiliate fee if anyone orders the item.
Details about installing the mosaics will have to be a separate post— I hired contractors to help install the first two and some things went poorly. I’ll be installing the next three mostly on my own with some help from a neighbor. I’ve built a kind of rotisserie to flip the mosaics upside down so that the mortar can be applied from the back and once I have video of that, it’ll be easier to explain. Because I don’t want to risk a finished mosaic being damaged, I’ve gone through many design iterations of the tool to flip them and will be testing it with a fake mosaic until it works flawlessly.
That pretty well covers the planning, prep and practice for this project. I’ll write up individual posts for each mosaic to go into more detail with specific examples.